Graphic designers and photographers often have to apply a series of actions or processes to multiple images from a photo shoot. This can get tiresome and the entire reason why we have computers is so that we can avoid doing boring repetitive work, right? That’s where batch processing of images comes into the picture, and I can tell you that batch processing in Adobe Photoshop has saved me a ton of time and grief over the years.
Now that I’ve started using Affinity Photo more often, I’m happy to note that has a very feature-rich tool that allows you to batch-process multiple images in a fast and very efficient manner. In fact, I wished that some of the options that it had were available in Adobe Photoshop too! So, let’s look into how you can use the “New Batch Job…” command that’s in Affinity Photo’s ‘File’ Menu, and let’s also compare it to the tools that Adobe Photoshop has to achieve similar results.
Batch Processing in Affinity Photo is Not Like Photoshop’s Batch Dialog
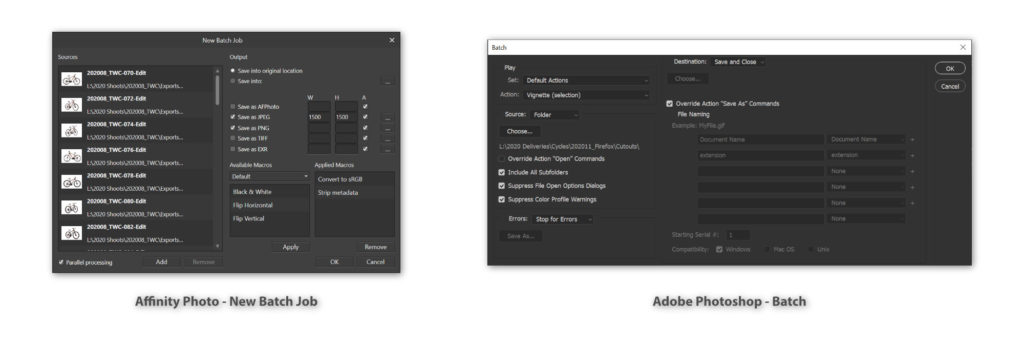
Affinity Photo is clearly not trying to emulate Adobe Photoshop‘s Batch commands. While there are similarities to “Batch”, “Batch Job”, is actually more like Photoshop’s “Image Processor”.
There are some significant differences between Photoshop’s ‘batch’ and Affinity Photo’s ‘batch’ tools. Take a look at the comparison images below. While both do allow you to use actions, that’s probably where the resemblance ends.
Photoshop allows you the flexibility to rename files, apply commands to multiple folders, saving new files, or apply actions to the same files and re-save them. In contrast, Affinity Photo only allows you to apply actions while saving new files. The originals are not touched. This is very similar to Photoshop’s Image Processor.
Is ‘Batch Job’ A More Powerful ‘Image Processor’?
If you use Adobe Photoshop to process multiple images, you know that converting a large number of files to JPG, TIFF, or PSD formats is probably easier handled by Image Processor (File>Scripts>Image Processor…), rather than the Batch dialog (File>Automate>Batch…). A quick look at the image below will show you that ‘New Batch Job’ is more like ‘Image Processor’. But… is it just as good, or better than Adobe’s tool? Let’s find out.
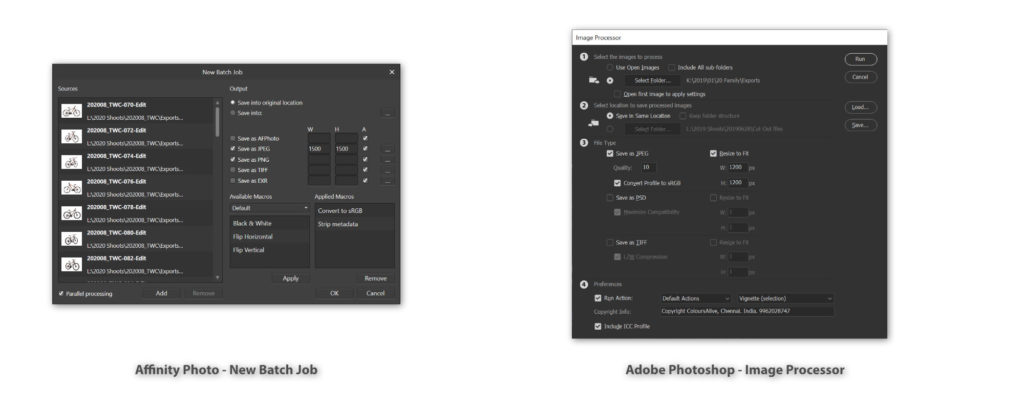
Affinity Photo’s tool doesn’t just copy Photoshop. There are some significant differences. Let’s get the negatives out of the way first.
Selecting / Opening Files
Batch Job doesn’t work with folders very well. In fact, it doesn’t work with folders at all, forget about sub-folders. You MUST select each image that you want to process, and you can’t just add already open images. This is a big hindrance to people who use this feature extensively.
You should note that Batch Job can also process RAW files
Saving Files
The saving options available in Batch Job also fall a little short, when compared directly to Image Processor. Both software allow you to save to the same folder, or to choose a new destination.
However, Image Processor also allows you to choose whether to save all files into the same folder (Keep Folder Structure – ON), or whether to save each file type into its own folder (Keep Folder Structure – OFF). This has saved me time and helped me avoid making mistakes many, many times.
Affinity Photo’s Batch Job feature just puts all file types into the same folder. I’m not sure that I like that.
Now that we’ve got the negatives out of the way, let’s look at the positive side of things.
Save As File Type Advanced Options
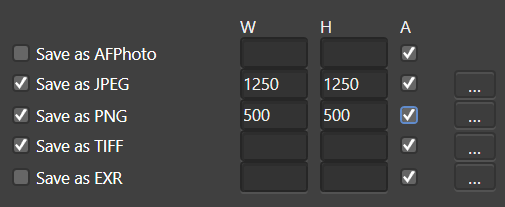
This is a real superpower that this innocuous dialog box has.
Each file type also has advanced options that are available under the ‘…’ button.
Pixel Format allows you to choose Color Modes: Grayscale, RGB, LAB, and CMYK, based on the file format selected. You can also choose your bit depth: 8-bit, 16-bit, and even 32-bit when it comes to TIFF and EXR.
You can also choose the resampling method: Nearest Neighbour, Bilinear, etc. Matte Color allows you to choose which color gets filled into transparent areas of the image.
You’ll see that the other options available to you depend on each file type (see images below). For example: for JPG files, you can choose the Quality, while for TIFF files you can choose between ZIP, LZW, or no compression method. You also get to choose the ICC profile and bit-depth to save files in.
These are very powerful options.


Image Resizing and Aspect Ratio
Each Save as file type allows for a customized width and height option. Just enter the pixel size that you want the longest edge to have, and make sure that the checkbox below the A column is ticked. This checkbox ensures that the original aspect ratio of the image is maintained.
Parallel Processing

This is a big feature, hidden away at the bottom of the window. It’s turned on or off just by clicking a checkbox.
Affinity Photo has the option to process multiple images simultaneously, making the most of your multi-core CPU. This is great if you’re processing hundreds of images, and I’ve seen small files being processed much quicker than in Adobe Photoshop.
If you are processing large images, it’s probably best that you are using an SSD drive to read and write your files, and also have a lot of RAM available. If not, turn off parallel processing to just run a single image through the batch process at a time.
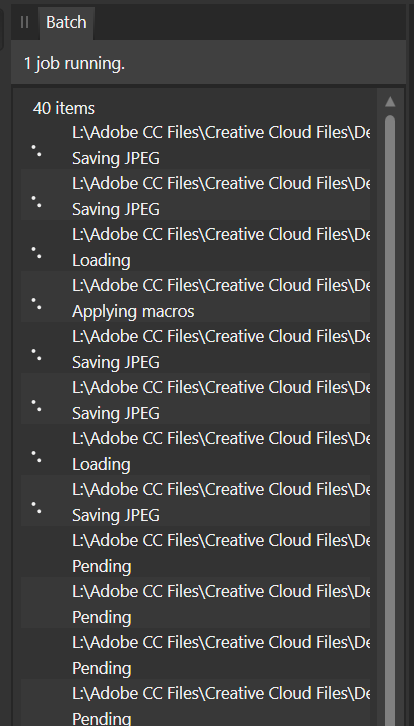
When the batch process is running, you will see a list of files, with their paths displayed, as well as the action that is currently being performed.
In the example to the right, you see that 8 images are currently being processed. I am running Affinity Photo on a 4-core processor that has hyperthreading enabled, which allows for 8 threads.
Yes… The files are saved in an Adobe Creative Cloud folder… the irony!
Choose a Macro to Use
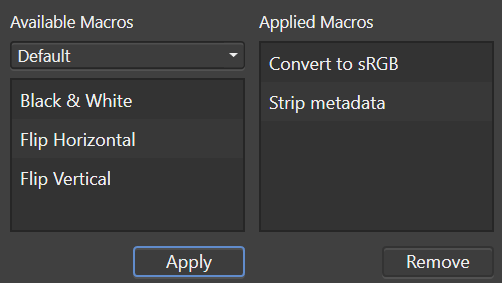
Here’s another place in which Affinity Photo outstrips Adobe Photoshop. You can choose a macro action to run from the list of Available Macros. Once you select the macro and click Apply, these get moved to the stack on the right, entitled Applied Macros. You can create a stack of macros (called ‘Actions’ in Photoshop) to perform some very complicated sets of operations, with ease.
Some of the defaults, “Convert to sRGB” and “Strip Metadata” are already in the advanced save options, so they may or may not be redundant. However, you’re also able to create your own macros and use them in these batch processes.
In short, this is a very powerful tool in the hands of someone who knows how to use it well. It could also lead to disaster, so some experimentation may be in order. Don’t say we didn’t warn you. ;-)
9 Steps to Use Batch Processing in Affinity Photo:
- Open “Batch Job” by clicking File>New Batch Job… in Affinity Photo
- Select your image Sources by clicking on the ‘add’ button.
- Choose where to save the processed files in a) the original location, or b) a new location (choose … to select the destination folder)
- Choose a file format to output (you can choose from AFPhoto, JPG, PNG, TIFF, and EXR)
- Choose whether you want to have the images resized, and what the dimensions will be. Tick the check box under ‘A’ to ensure that the original aspect ratio is preserved
- Click the ‘…’ button at the end of each file type choice to access advanced options that are customized to each file type.
- Choose which Macros to enable by selecting them and clicking the ‘apply’ button. They will appear under the Applied Macros pane.
- Click OK to run the batch process.
- The Batch pane will open up, showing the progress that the app makes as it applies the actions that you’ve selected, and then saves them to the drive. It will automatically close once it’s done.
Differences from Photoshop’s Image Processor
As I’ve mentioned, this feature isn’t quite perfect as yet. There are a few differences from Photoshops implementation, but there are some differences that I see as improvements to Photoshop’s options.
Unlike Photoshop, Affinity Photo does not open up the images that it is processing for you to see. I think that this keeps the workload on your GPU lower. Imagine opening and rendering multiple RAW images at the same time! I think that not opening the files makes the parallel processing feature more efficient.
I would like to see improvements in Affinity Photo’s Batch Processing file handling – with the option to add folders to the batch process too. Having each file format saved to its own folder – the way Adobe Photoshop’s Image Processor does – would also be welcome.
Conclusion
With the “Batch Job” feature, Affinity Photo has a very powerful batch processing tool to counter Adobe’s Image Processor tool in Photoshop.
The Parallel Processing and the advanced save options that are customizable for each file type make it more powerful than its Adobe Photoshop counterpart. However, it also has some pitfalls in the form of the lack of real file-handling capabilities.
If you’ve used both, do let us know which tool you prefer.
Affinity Photo is a low-cost, but feature-rich software that I have been exploring, and I will be writing more about this software in the days to come. Download the trial version of Affinity Photo and try it out yourself for free.
Help Us To Continue Creating
Get our email newsletter to stay up-to-date with our latest posts. It’s easy to read and is mailed once in 2 weeks.
The easiest way to support Beyond Photo Tips is by using our affiliate links when you buy anything at all. It will never cost you anything extra, and we get a small commission from it, which helps us a LOT! We share our recommended equipment list here.
Some of the links to products on this website are affiliate links, and we only ever link out to gear that we recommend.
You could also show your appreciation by buying us a coffee. Finally, we appreciate you being a part of the community, so do say hi!


