If you’re a heavy Photoshop user, you probably already have at least 32GB of RAM. At this point, you’ll need to speed up the delivery of data to your processor and RAM. One way to do this is by having multiple fast drives delivering data to the processor, RAM and GPU via dedicated data streams. For that, we have a suggestion about how to set up your computer with multiple SSDs, to get optimal bandwidth. Let’s get started.
I Don’t Have Infinite RAM, So How Can I speed Up Image Editing?
First, remove any performance bottlenecks by adding enough RAM. Bottlenecks are specific restrictions that slow down the entire workflow. RAM isn’t that expensive today, and having enough RAM can make a huge difference to performance intensive applications like Photoshop and Lightroom.
Once that’s done, remember that any data on a HDD is many orders of magnitude slower (references at the end of the article) in terms of access speeds and data throughput when compared to RAM.
So, when the data that Photoshop needs to process is not found in RAM, but on your HDD, accessing is much slower because it involves a spinning glass platter that stores data on particular spots on the disk, and a ‘read head’ needs to physically move to that spot to access the data.
SSDs Are Faster Than Mechanical Drives
Enter, the Solid State Drive (SSD). It stores data on silicon microchips much like your RAM; but unlike RAM, it does not lose information when power to it is turned off (aka, non-volatile memory). The benefit of it not needing physically moving parts to access data is that all the data is accessible all the time, and can be read and written much more quickly.
There are in fact, two different types of SSDs: SATA SSDs and NvME SSDs, and they have two different interfaces. You can read all about SSDs, and more in this article.
Now, SSDs are quite a bit faster than HDDs, and cheaper than RAM. So, if you can’t afford 1TB of RAM, but you can afford an SSD, it makes sense to tell Photoshop to use your SSD instead of your HDD for its scratch disks/paging files.
This will be our primary angle of attack, with some further improvements.
Our Suggested Optimal Setup
At Beyond Photo Tips, we actually suggest having multiple SSDs for optimal bandwidth usage.
We suggest having one SSD each for each of these purposes:
- For the OS and programs,
- For your Scratch Disk & Caches, and
- For your active project files.
By doing this, you have multiple parallel pathways from the processor / RAM to your storage devices with minimal interference and bottlenecking of resources. We go into all this, plus more detail in this article. In addition, we suggest having HDD or NAS storage for Archival purposes.
Here’s how you set up your computer for optimal speed and SSD usage.
1. Install Your OS & Programs On An SSD
Speeding up your program’s executable files, and access to the various files it needs for its functioning will have an immediate effect on the performance of Photoshop and Lightroom.
2. Set The Photoshop Scratch Disk To Use The Scratch Disk SSD
Setting up Adobe Photoshop CC to use your dedicated SSD scratch disk is rather easy. Here are instructions for you whether you use Photoshop on Windows or on an Apple computer.
In Windows:

- Open Adobe Photoshop CC
- Click on the Edit menu, and scroll down till you see Preferences.
- From the Preferences Drop-Down select Scratch Disks…
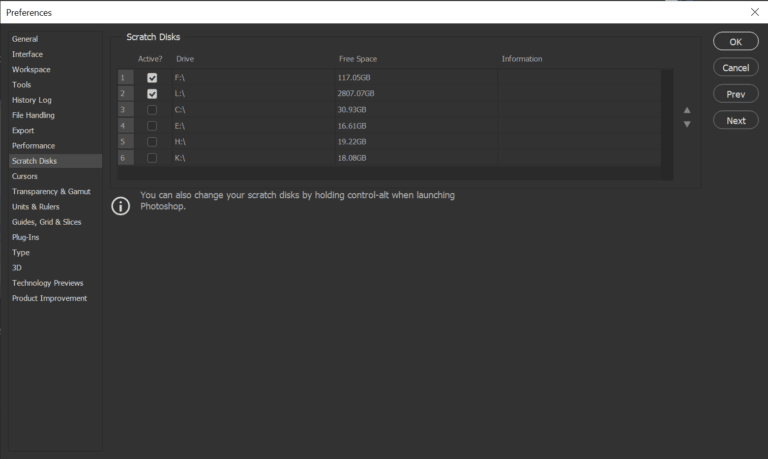
- The Preferences dialogue box will open with the Scratch Disks section open. There you will see all your available drives.
- By default, the primary drive will be selected as the active scratch disk. You will know which one this is, by the small tick (check mark) in the box to the left of the drive letter.
- Ensure that the box next to the drive letter of your Dedicated Scratch Drive SSD is checked (ticked), and that all the others are not checked.
- Click OK in the top right-hand corner of the dialogue box.
- Shut down and then restart your computer and Photoshop. You’re ready to experience the speed boost of using an SSD as your Scratch Disk.
In macOS:
- Open Adobe Photoshop CC
- Click on Photoshop menu, and then Preferences.
- From Preferences select Scratch Disks…
- The Preferences dialogue box will open with the Scratch Disks section open. There you will see all your available drives.
- By default, the primary drive will be selected as the active scratch disk. You will know which one this is, by the small tick (check mark) in the box to the left of the drive letter.
- Ensure that the box next to the drive letter of your Dedicated Scratch Drive SSD is checked (ticked), and that all the others are not checked.
- Click OK in the top right-hand corner of the dialogue box.
- Shut down and then restart your computer and Photoshop. You’re ready to experience the speed boost of using an SSD as your Scratch Disk.
3. Set Up Lightroom Cache & Catalogue files Correctly To Use An SSD
Adobe Photoshop Lightroom Classic requires you to set up two different parts to use your dedicated SSD. The first is your Camera RAW Cache, and the second is your Lightroom Catalogue file (.lrcat file).
Let’s start with the Camera RAW Cache since this offers the most potential for an increase in speed.
What is The Camera RAW Cache?
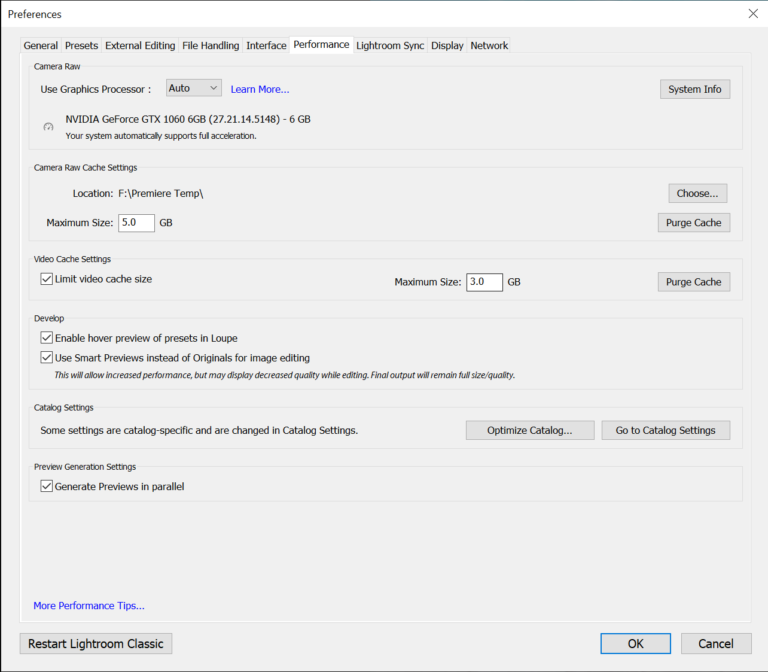
The Camera RAW cache is where Lightroom stores previews, thumbnails, and Smart Previews for the images in your library. There are hundreds of small files that need to be accessed quickly in order for Lightroom to seem responsive and fast. This definitely needs the power of a speedy SSD.
Setting Up The Camera RAW Cache To Use Your SSD

In Windows:
- Open Adobe Photoshop Lightroom Classic (phew, what a name!)
- Open the Edit menu, and scroll down to Preferences. Click on it. (You can also press Ctrl+, as a shortcut).
- Open the Performance tab.
In macOS:
- Open Adobe Photoshop Lightroom Classic
- Open the Lightroom menu, and scroll down to Preferences. Click on it. (You can also press Ctrl+, as a shortcut).
- Open the Performance tab.
What Is The Lightroom Catalog File?
The Catalogue file is where all your edits, tags, keywords, star ratings, and metadata lives even if you’ve saved sidecar .xml files. Access to this file would ideally be as quick as possible.
Setting this up is as simple as copying your current lightroom catalog file to the SSD that you want it on, and opening Lightroom by double-clicking it. This should speed up access to it.
Your Projects on SSD
The third SSD can be set up to store your current project files. While SSDs are cheaper than RAM, they’re still more expensive per GB than HDDs, for long term storage. The SSD gives you the benefit of fast file access. This means that Images and Videos are previewed faster.
However, once you complete a project, you should shift it to a HDD drive (or a safer storage option, such as a NAS) for long term storage and back up. This frees up your more expensive SSD for active projects.
With an SSD freed of files, you will be able to work with your current project files quickly, while also reaping the benefits of cost effective HDD storage.
In Summary:
While this kind of hardware setup can be used with multiple drives no matter whether they are SSDs or HDDs, the greatest benefit is derived from using SSDs. Having multiple data streams to handle the throughput from different drives, for different types of data will allow you to improve the performance of Photoshop and Lightroom.
Saving your RAW image files to an SSD will have the most immediate, and greatest impact on their performance, so do remember that.
SSDs will speed up the performance of almost any operation that involves data transfer. Today, their price and capacities are at a place where we can begin using them for daily computing and using the slower, but cheaper HDDs solely for archival and mass data storage.
Further References:
- What’s the Diff: RAM vs Storage
- SSD vs HDD Speed
- How to Speed Up Lightroom Classic – Finding and Removing Bottlenecks
Help Us To Continue Creating
Get our email newsletter to stay up-to-date with our latest posts. It’s easy to read and is mailed once in 2 weeks.
The easiest way to support Beyond Photo Tips is by using our affiliate links when you buy anything at all. It will never cost you anything extra, and we get a small commission from it, which helps us a LOT! We share our recommended equipment list here.
Some of the links to products on this website are affiliate links, and we only ever link out to gear that we recommend.
You could also show your appreciation by buying us a coffee. Finally, we appreciate you being a part of the community, so do say hi!


