Luminar Neo has been on my radar for quite a while. Previously, as a non-user, I had a few apprehensions about using it, but now that I’ve used it for a while I can give you a deep-dive series of articles about Luminar Neo starting with this overview of the application. In this article, I’m going to explore Luminar Neo as it exists in early 2024, and share my opinions and observations about how the application works, the features, and functionality that it provides. So, let’s get to it.
While I have purchased Skylum tools in the past, like Aurora HDR, this copy of Luminar Neo was provided to me for evaluation purposes… I was approached around a year ago to take a look at the new Luminar Neo, and for various reasons I didn’t get around to it. Over that span of time, the team at Skylum have been busy adding on modules and features to the base application that expand its functionality. The results are quite impressive, and I really have to share this app’s functionality.
The most recent additions have been AI and Generative AI tools that seem really interesting… But let’s not get ahead of ourselves. Let’s start at the very beginning.
Luminar Neo – What is it, really?
Luminar Neo is a RAW and JPG image processing program brought to you by Skylum, which also has image management, cataloguing and selection features. In some ways it is similar to Adobe Lightroom, but there are notable differences.
Luminar Neo can be used as a standalone program if you want to use the file management aspect of the tool, or as a plug-in to Adobe Lightroom or Photoshop if you just want to use some of its other features or presets.
Luminar starts off as a simple image processing tool, with the main interface dominated by the Catalog, Presets, and Edit tabs in the middle of the screen.
The workflow is simple:
- You add images that you have photographed to the Catalog
- Once the images are in the catalog you will be taken to your library of Presets. You can choose to apply these presets to your images…
- …or edit them yourself, in the Edit tab.
- Once you have selected images that you want to export, you can export them via the “Share to…” button in the top right corner of the app window (to your disk, mail, messages, or to your hand-held device via the accompanying mobile app), or navigate to File > Export… to export files that you can share with others.
File Management – The Catalog
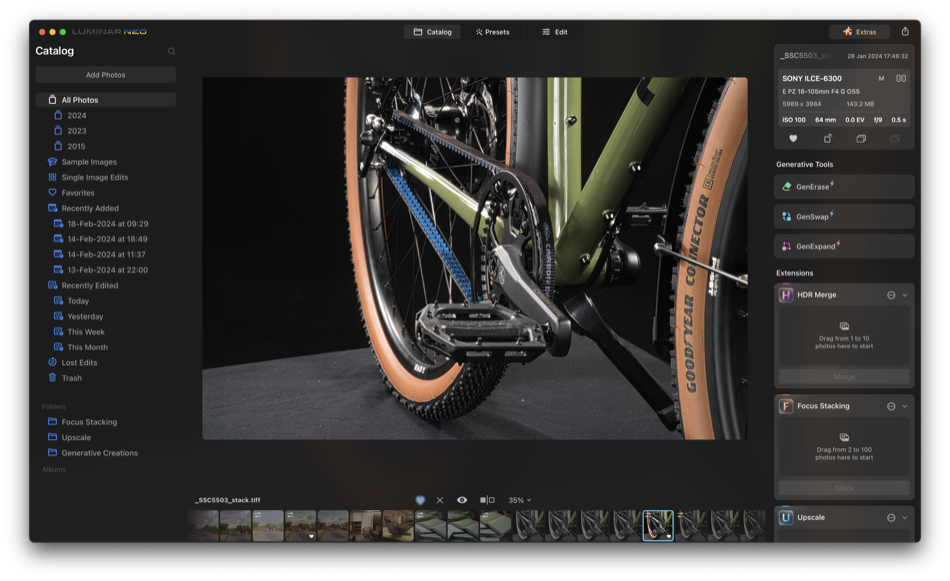
When you start using Luminar Neo as a standalone RAW/JPG editing app, the first step is to add your images to the file management section. In Luminar Neo, this is called the Catalog. This is your home base, with images viewable as a grid in the middle, flanked by albums and folders to the left, and image EXIF, generative AI tools, and extensions on the right.
From the catalog, you can select favorite images or mark rejects, create albums, sync adjustments across a group of images, or flip/rotate images. You can also double-click images to see an enlarged version, with small thumbnails of the other images in the current album lining the bottom of your screen.
Left Column
The left panel allows you to sort through your images by year, month and date, or the date that you imported/edited images, useful!
You can also import entire folders directly, in which case, these folders will show up under the “Folders” section in the left column. Of course, these images are also sortable by date higher up in the same column.
Albums are selections of edited and unedited images that can be collected from different folders and dates. This allows you to organize images as you see fit… For example, an album of a loved-one over the years, or a house restoration that happened over a span of months.
Middle Column
The middle column displays images in a grid. There are a number of filters across the top that can change which images you see… You can choose to see just the rejected images, to check if you’ve accidentally missed out any important image. You can sort by time, so that you see images sequentially. Or you can choose to sort by file name, type, or size.
What they don’t have in Neo, are file ratings. So you can’t mark some as 5-star, others as 4-star, etc. This used to be a part of Luminar 4, so it seems to be a conscious design decision to keep the interface simple for the intended audience of amateur photographers. You also can’t give them color labels to group them.
While star ratings and labels are useful tools for professional photographers who go through and grade hundreds and thousands of images per photoshoot, these aren’t very useful to amateurs, and only serve to confuse them.
Right Column
Finally, the right column serves to display important EXIF data for the selected image, and below the EXIF data, you will find colorful shortcuts to various generative tools, and extensions. The entire right column can be hidden using a button above the image grid, to free up more space for image review; useful.
Presets
In my work, I don’t really use presets much, but I did explore the presets that were provided with Luminar Neo.
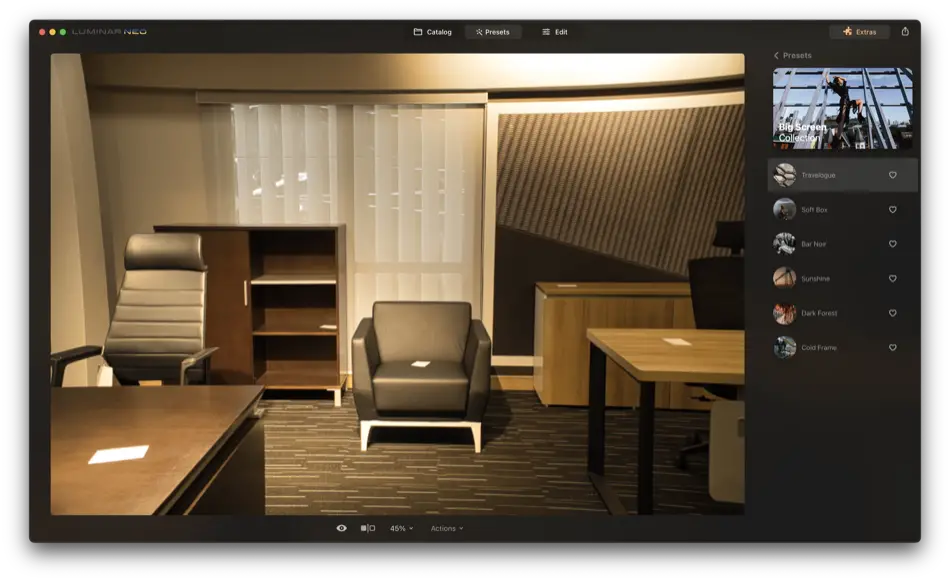
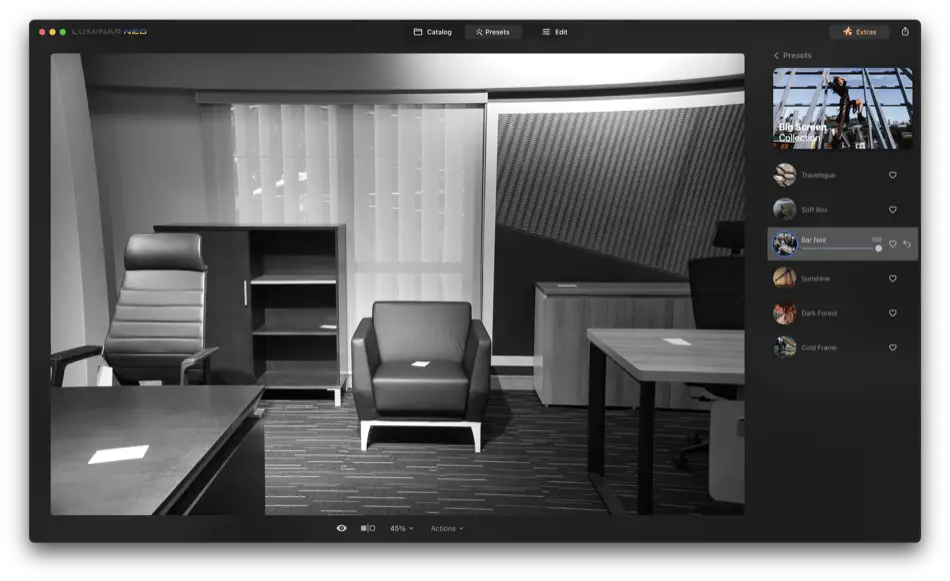
You can click on the “Presets” tab, once you’ve selected an image. You’ll be taking to a screen where your image is shown large in the main window, with a column displaying various presets on the right.
You can choose a preset that you think suits the image, and a preview is immediately processed for your entire image. On my MacBook Pro with M3 Pro processor, this happened really quick, with very little processing time.
Luminar Neo comes with a few presets already installed, but you can purchase more, or even create your own presets (I’ll tell you how, later in the article).
Once you have a preset that you like, you can move on to the “edit” tab, to fine tune the edit. In my case, I didn’t use any presets, I just went on to the edit tab directly… Let’s move on to that, shall we?
Core Image Editing Functionality – The Edit Tab
This is the real meat and potatoes of the app. Once you have the preset that most closely matches your vision for the image (or if you’re like me and just want to edit the image directly), you can click on the Edit tab.
The edit tab also opens up with three columns. Layers on the left, a preview of your image in the middle, and “Tools” & “Edits” (the various editing sliders and panels) on the right.
Let’s start with Tools.
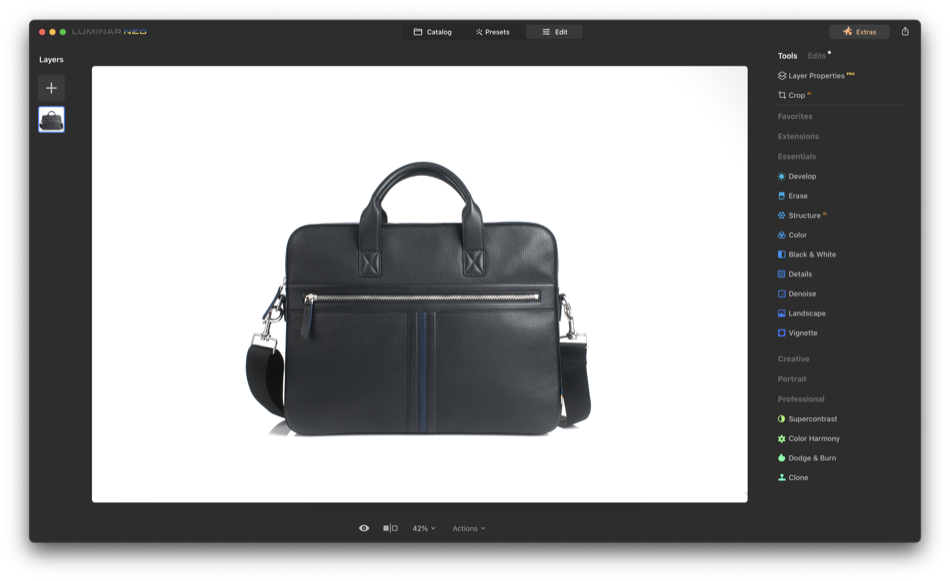
Tools
Luminar Neo has a rather impressive set of tools. They’re organized under the headings:
- Favorites
- Extensions
- Essentials
- Creative
- Portrait
- Professional
Each of these groups has a number of features under it. For example, essentials starts off with the Develop panel which by itself is quite impressive.
Under Develop alone, you’ll find features like Camera Profile, Light, Blacks & Whites, Curves, Color, Sharpness, Noise Reduction, Optics, and Transform. This one panel will allow you to perform most of the edits that are needed for an image. You’ll be able to fine-tune your exposure, contrast, colours, and even do some perspective correction if needed.
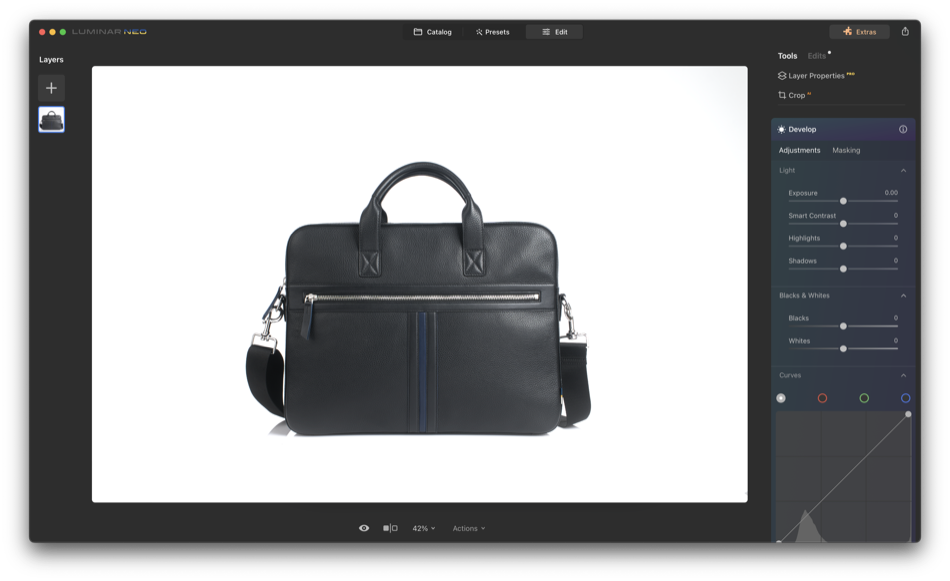
You’ll find a number of other tools that you can use for processing landscapes, for noise reduction, and so much more.
In many instances, you will notice that the tools have their own masking options. This is a small detail that can hide very interesting functionality, because it means that each tool can be applied to a specific region of the image, and that means that each tool can be applied multiple times.
To be able to edit the settings of each tool with multiple applications, we need a different tab, and that’s where the Edits tab comes into play.
Edits
This is where things get a little confusing… at the same time, having an edits panel like this is quite useful. Edits is where you can see all the changes that have been applied to an image on various tools. The tool panel is where you start editing, but the edits panel is where you should be once you have selected all the tools that need to be applied.
The reason for this is because when you switch between the edits and tools panels, you sometimes see one of the tools such as noise reduction has suddenly lost its settings. This is not the case. If you see that your tool has suddenly been reset, it’s most likely that you are applying settings to that tool for the second time.
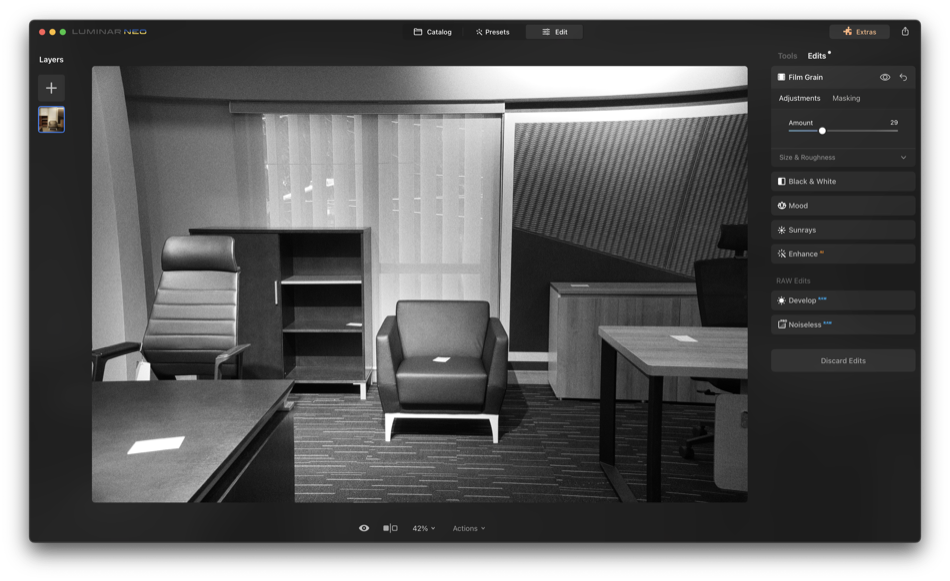
The solution is to go to the edits panel where you will be able to see whether a particular tool has been applied multiple times or not. This will take a little getting used to because at first glance, it seems like the Tools panel is where all the settings should live permanently. However, that is not the case and one should remember that.
Clicking through, and using the various tools in the edits column is a slightly disconcerting experience. For example, if you click on the initial Develop (RAW) tool in the Edits column, all the tool effects that have been added after that (like vignetting, etc) … disappear, and you are shown the image as it was at the time that you used the Develop tool.
In a way this is useful, it helps you understand exactly what you’re doing when you push each slider, but unless you know that you should expect this, it can be confusing for a first time user.
After you have finished editing an image, you must come back to the catalogue tab, select the next image and click edit to start editing the next image.
Layers
now we haven’t forgotten the layers panel that is to the left of the image preview. By default when you’re editing an image, it appears as a square icon with an equally sized plus icon above it. If you click on the plus icon, you will be shown a number of assets which you can click to overlay on top of your existing image. These assets are translucent and transparent images like Lens Flares, Bokeh, Light Leaks, Textures and more.
You can customize these layers further, using the various tools that we have already discussed, but you can also add masks to each of these layers, and resize them as needed to make them look natural in your image.
An Interesting Ability – Extending Functionality
You can add on features to Luminar Neo, via the ‘extras’ button that you will see displayed prominently in the top-right of the application window, right next to the “share” icon…
The Extras take the form of “Extensions” and “Marketplace” offerings. The “Extensions” are special features like HDR creation, Focus Stacking, Panorama Stitching and other AI features, that can be purchased directly from Skylum at an extra price. The “Marketplace” is a section where one can buy various Presets, Skies, LUTs, and Overlays that are on offer from third parties.
Luminar Neo’s Extensions
As mentioned earlier, Luminar Neo allows you to expand its functionality with ‘plugins’ that they call ‘extensions’. These extensions add functionality that the base application does not have. I’ve listed out the 8 extensions that are currently available, in no particular order.
- HDR Merge: Combines multiple images of different exposures to create a high dynamic range (HDR) image with enhanced details in both highlights and shadows.
- Focus Stacking AI: Automatically merges multiple images with different focus points to create a single image with extended depth of field, ensuring sharpness throughout the entire scene.
- Panorama Stitching: Seamlessly merges multiple photos of a scene taken from different angles to create a panoramic image, capturing a wider field of view.
- Noiseless AI: Utilizes artificial intelligence to effectively reduce noise and grain in photos while preserving important details, resulting in cleaner and more professional-looking images.
- Upscale AI: Enhances image resolution and sharpness using advanced AI algorithms, allowing for upscaling of images without significant loss of quality.
- AI Background Removal: Automatically identifies and removes the background from an image, making it easy to isolate subjects for compositing or editing purposes.
- Supersharp AI: Enhances image sharpness and clarity using AI-powered algorithms, producing crisp and detailed photos with improved overall quality.
- Magic Light: Intelligently adjusts lighting conditions in an image to enhance its visual impact, providing greater control over the mood and atmosphere of the scene.
Each of these tools deserves a deep dive in itself, and there is just not enough space in this article to give them sufficient detail.
Generative AI Features
Today, it seems like everybody is coming up with generative AI features, and Luminar Neo is no slacker here. At the same time, I wouldn’t say that generative AI features are the reason why you should explore or by luminar Neo. These are additional features that are in keeping with current trends, and add on to the substantial feature set that the app already has.
There are three generative AI features in Luminar Neo, they are GenSwap, GenErase, and GenExpand. at the time of writing GenErase is my favorite but GenSwap comes a close second. Let’s take a look at how these tools work.
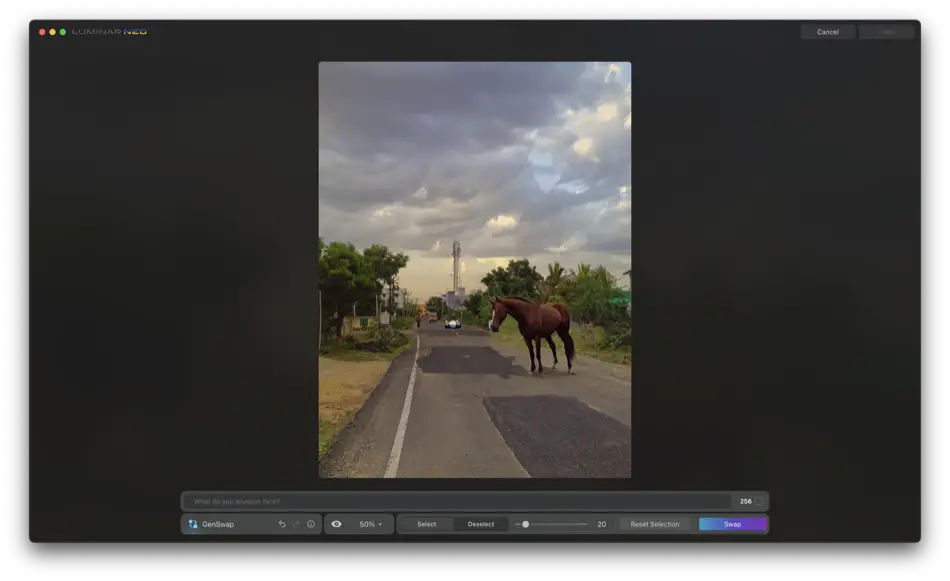
All three generative AI features have a similar interface. You start by brushing in the area that you want affected. It appears as a red translucent overlay on top of your image. Once this is done, you can either ask Luminar Neo to erase, or swap the object selected.
GenExpand works slightly differently, and starts off with a bounding box that looks like the crop tool. You can use this to expand the size of your image, thereby defining the area that Neo will have to fill in.
Both GenSwap and GenExpand have text fields where you can describe what you want filled in to the space. GenErase does not have this text field.
An image that has generative AI applied is saved as a separate image in its own folder – “Generative Creations”.
GenSwap – Fill in Pixels With AI Generated Imagery
GenSwap allows you to replace an object or a space in the image with something that you describe in the text field that they provide. you use a brush to make a selection, type out a textual description of what you want in that space, and GenSwap tries to merge the existing image and the requested generated image in as realistic as possible.
While this does work often enough, it is not perfect and doesn’t always come out exactly as you imagine. This means that you have to, sometimes, re-run the process. Other applications, like Adobe Photoshop, have a feature where they show three different options for each generation; Luminar Neo does not do that. As a result you may spend additional time creating options if the first one isn’t to your liking.
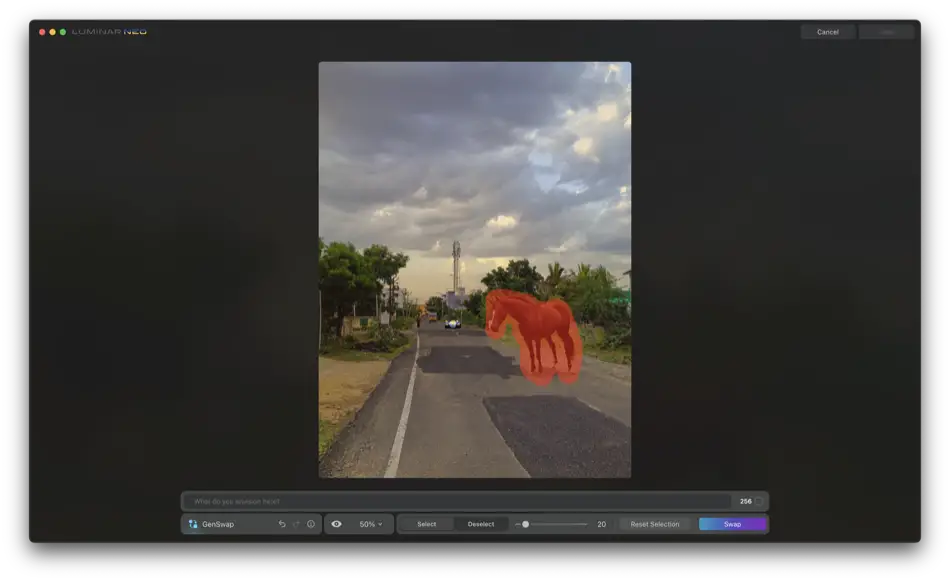
GenErase – Remove Objects With Generative AI
As mentioned earlier, GenErase is one of the features that I like. Neo does have an ‘Erase’ feature in the essentials section of the Edit tab. Is this a duplication of features? I don’t think so.
I feel like the Erase feature is more of an automated clone tool, and it does an excellent job in most circumstances. However, it does fail at times. Perspective, and textures sometimes challenges the tool, and makes the result look artificial.
On the other hand, GenErase actually takes into account the area surrounding the selected space and fills in new content. This means that there are no repetitive textures, perspectives seem a little better, and it all can look a little more seamless than the existing erase tool.
However, there are some downsides too. Resolution can be low if you select too large an area (we will touch on this later), and sometimes it misunderstands the subject of the image, and you need to run the command again.
GenExpand – Expand an Image, Use Your Imagination
GenExpand is useful when your image needs to be a little wider or taller, and the content isn’t a gradient or texture that can easily be cloned.
The interface is similar to other generative AI tools, but the image starts off with crop handles on the border. You can re-frame the image to get the size and ratio that you need, and describe the content that needs to be filled in to the space that’s added.
This is a useful tool for graphic design, where an image needs to be extended vertically or horizontally to fit a website banner, blog featured image, report cover, etc. However, the feature can also be used creatively to re-frame a photograph and experiment with composition.
What Stands Out in Luminar Neo?
Luminar Neo stands out as a simple to use, yet comprehensive, image editing tool, which allows amateur and beginner photographers to really explore the capabilities of their cameras, and the RAW files that they create.
Luminar Neo is relatively simple to use, and I expect that beginners in photography will find its feature set easy to get started with, and to explore their creative ideas with. As they progress in skill and equipment, the ability for Luminar Neo to add on features like creating HDRs, Panoramas, and more, will allow them to explore new techniques for creative image creation, that would otherwise have taken much longer to experiment with and master.
This ability to expand features means that Luminar Neo does not come with a heavy initial overhead price, but one that can be spread over time as the photographer develops their ability and skill. A very valuable feature, IMO.
Luminar Neo is Ideal for Hobbyists & Advanced Amateurs
At Beyond Photo Tips, we aim to provide useful information and guides for the Advanced Amateur photographer. Luminar Neo is placed right in that space.
It’s ideal for the casual photographer who wants to process their travel, photographs, family memories, occasional wildlife and bird photographs, event photos like birthdays, anniversaries, weddings, etc.
It has all the makings of a comprehensive, high-quality image editing tool, but not the complexity that these tools usually come with, when created for professionals.
As you might be able to see, there is still a lot left to be unpacked with Luminar Neo. And that is just not possible in a single article like this. Instead, I will be doing deep-dives into certain aspects of Luminar Neo so that these features can be discussed in detail.
Remember to bookmark Beyond Photo Tips, and to come back for more Luminar Neo content in the future.
A Professional’s Perspective
Luminar Neo, in my experience, has the ability to create high-quality images and sometimes rivals like Adobe Lightroom in image output quality. I brought in some commercial photography images that were taken in the studio, and I was surprised by how easily and quickly I was able to create usable images with Luminar Neo’s Supercontrast and Vignetting Tools alone (no, Develop was not used).
However, the software is clearly targeted towards hobbyists and amateur photographers, as it lacks some important features like keywording, tagging, ratings, labelling, etc. I’ve written about Capture One Pro in the past, and I feel that either Capture One Pro, or Lightroom Classic are more appropriate tools for the professional photographer (of course, those are not the only options).
For anyone getting into serious photography, bordering on early freelance work, Luminar Neo still provides a solid platform on which to build, and create images that are very sale-able.
Stock Photographers will find many of the features that Luminar Neo offers to be useful, and I suspect that it will actually speed up their ability to process a high number of images per hour, compared to more complex tools.
Luminar certainly has come a long way since Luminar 4, and Luminar AI.
Having said that, I would not recommend Luminar Neo to hard-core professional photographers, who would need more advanced features, and higher levels of control for their image, processing and workflow.
In the coming weeks and months, I will be exploring Luminar Neo’s workflow, and sharing important insights into how you can get higher-quality output, as well as some hidden features that others might not touch upon. Stay tuned for upcoming articles by subscribing to our RSS feed, or connecting with us on social media like, Facebook or Twitter.
If you’re interested in taking up some photography challenges, remember that we have an entire section dedicated to photography projects that you can set for yourself, to upgrade your photography skills and visual thinking process.
How To Get Luminar Neo
Find out more about Skylum Luminar Neo (aff.).
Luminar Neo Discount Code: BPTNEO10 We’ve got a special discount code for you to use. Enter the code to get a 10% off on your purchase of Luminar Neo lifetime license, as well as the annual Pro and Explore subscriptions.
Help Us To Continue Creating
Get our email newsletter to stay up-to-date with our latest posts. It’s easy to read and is mailed once in 2 weeks.
The easiest way to support Beyond Photo Tips is by using our affiliate links when you buy anything at all. It will never cost you anything extra, and we get a small commission from it, which helps us a LOT! We share our recommended equipment list here.
Some of the links to products on this website are affiliate links, and we only ever link out to gear that we recommend.
You could also show your appreciation by buying us a coffee. Finally, we appreciate you being a part of the community, so do say hi!


