
Backlighting is a technique where the light source is placed behind the subject. It can bring out an ethereal glow in translucent subjects, making ordinary subjects like flowers, fruits, and even insects look extraordinary. This is a particularly effective technique in close-up shots, often captured in macro photography, as well as food photography, where it can emphasize textures and make dishes look more appealing. While backlighting is a powerful photography technique, it should be used with restraint and requires a degree of control over the light source, the light’s angle in relation to the subject, as well as the camera’s angle and exposure settings. Let’s look at how you can get started with all these variables.
The Power of Backlighting
Backlighting is more than a mere photographic technique—it’s a creative tool that has the power to transform ordinary subjects into artistic masterpieces. With this method, even the most everyday objects like translucent flowers or fresh fruits take on a new vibrancy. The soft illumination enhances their natural colors and reveals their subtle, often unseen, beauty, making them appear extraordinary.
In macro photography, backlighting becomes a magic wand, highlighting intricate details and revealing the hidden complexity of seemingly simple subjects. For food photography, it’s a culinary spotlight that accentuates the enticing textures of a dish, making it look like a tantalizing delight that’s hard to resist. Such is the power of backlighting—it doesn’t just illuminate, it elevates and captivates, injecting a sense of awe into your photographic narratives. Perfect for both commercial and inspirational photography.
Mastering Studio Lighting for Backlighting
Creating an effective backlighting setup in a studio environment requires an understanding of the different types of lighting and how to control them. The main light source, typically a flash or continuous light, illuminates the front of the subject. However, a second light source is needed behind the subject to create backlighting. This backlight, or kicker, is often set at a higher intensity than the main light, creating a rim of light that outlines the subject, emphasizing its form and depth.
A reflected light source can also be used. This is typically achieved by using a reflector or a white surface to bounce off the light from the main source onto the subject. Reflectors help to diffuse the light, spreading it more evenly and softening shadows. In this kind of setup, the main light is usually behind the subject, and the reflection is used to fill in the shadows that it creates.
Showing Translucency in Materials
In translucent subjects, the backlight shines through the material, emphasizing the material’s delicate nature, texture, or filling. This is important information for us as a viewer because it allows us to understand the three-dimensionality of the object in a different way.

You will see the translucency of a material being enhanced by backlighting in many product photography shots, especially where glass (perfumes, liquors, juices, etc.), or fine cloth is involved. You’ll also see it being used in food photography to emphasize the cook’s skill in crafting fine dishes, to emphasize the fine slices of fruit, fish, or a cocktail.
Silhouettes: A Unique Effect of Backlighting
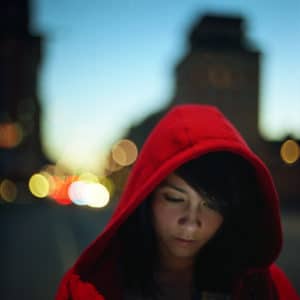
When backlighting is used strategically, it can create a striking silhouette effect. This happens when the subject is placed directly between the light source and the camera, causing the subject to appear as a dark shape without distinct features against a lighter background. It’s an artistic method that can add drama to all kinds of photography, but that should be used with care and restraint for the most impact.
Controlling Lens Flare in the Studio
Lens flare occurs when the light source is directly in the field of view, causing light to scatter within the lens and create a haze or artifacts. However, in a studio setting, photographers have greater control over lens flare. The enclosed environment makes it easier to observe the flare and adjust the lighting setup accordingly.
By changing the angle of the backlight or altering its intensity, you can control the amount of flare that appears in your image. Flags, or cutters, can be placed in the path of the light source to block unwanted light. By positioning a flag between the light source and the lens, you can prevent direct light from entering the lens and causing flare.
Optimizing Camera Settings for Backlighting
A balance of shutter speed, aperture, and ISO settings is key to achieving the desired outcome in backlighting. Shutter speed can control the amount of light entering your camera, with a faster speed allowing less light and a slower speed allowing more. The aperture, or the opening in your lens, can be adjusted to control light entry. A smaller aperture lets in less light, maintaining a darker subject against a bright background, while a larger aperture lets in more light, illuminating your subject. ISO, the camera’s sensitivity to light, should generally be kept low to avoid unnecessary noise.
Composing a Backlit Silhouette Image

The positioning of your backlight can dramatically impact the mood, balance, and overall aesthetic of your image. When positioning your subject, consider what you want to achieve with backlighting. If it’s a silhouette you’re after, position your subject directly between your light source and your camera. If it’s an ethereal glow, place the light so it strikes your subject from the side or at an angle while taking care to avoid flare.
The Rule of Thirds, a fundamental composition principle in photography, can also be helpful in backlit images. This rule involves dividing your image into nine equal parts with two horizontal and two vertical lines. Placing your main subject or the backlight source at one of these intersections can result in a more balanced and engaging image.
Personally, I always ensure that I have a very strong subject in my backlit images. I make sure that the frame is filled by it, and that there are pleasing shapes created by the whitespace created between the frame and the subject in addition to the shape of the subject itself.
The Art of Backlighting: Closing Remarks
Indeed, the beauty of backlighting lies in its ability to transform ordinary subjects into extraordinary ones. The rim of light, the ethereal glow, the translucent beauty, or the dramatic silhouette – each speaks volumes and tells a unique story. Particularly in macro and food photography, where the magic is in the minute details. Backlighting can add an artistic touch that leaves a lasting impression. It can turn a simple plate of food into a gastronomic delight, or a common flower into a piece of art.
As you journey into the fascinating world of photography, remember that techniques like backlighting are simply tools to help you manifest your creativity. They are your allies in creating images that reflect your unique perspective. Don’t be afraid to experiment and push the boundaries. We hope that the insights shared in this article will inspire you to try backlighting in your next photography session. We’d love to see your creations and hear about your experiences. Please feel free to share your thoughts and images in the comments below. Here’s wishing you many wonderful and illuminating moments behind the lens. Happy shooting!
Featured Image by Erika Varga
Help Us To Continue Creating
Get our email newsletter to stay up-to-date with our latest posts. It’s easy to read and is mailed once in 2 weeks.
The easiest way to support Beyond Photo Tips is by using our affiliate links when you buy anything at all. It will never cost you anything extra, and we get a small commission from it, which helps us a LOT! We share our recommended equipment list here.
Some of the links to products on this website are affiliate links, and we only ever link out to gear that we recommend.
You could also show your appreciation by buying us a coffee. Finally, we appreciate you being a part of the community, so do say hi!

I often have white reflector behind and off to the right just infront of the subject to get the kicker effect.
Thanks,
Chris